Welcome to my little corner of the web. I plan to use this space to share inspiration for crafty folk and anyone interested in the inevitable chatter of my daily life.
Happy New Year Friends. I hope that your holidays were wonderful and that you are looking forward to 2016 with an optimistic view. The holidays were busy around here as well. It's always busy when the children are home from school, my husband is home from work and everyone we know seems to pop over to say hello. Its a wonderful time of year that reminds me of our many blessings.
Between Skylander quests and origami overseeing, I had a chance to get a tiny bit of creative work done.
I created this beautiful card using the new High Society paper from Gecko Galz. The exact paper is HS09. I also used the beautiful image from the Pretty Portraits 2 Collage sheet.
You will need:
5x7 card base or cardstock to create one
Red cardstock of your choice (I used Bazzil)
Glitter glue
floral spray (I found mine at the dollar tree in with the Christmas decorations and chopped it up)
rolled roses
handmade hat pins
Making the Card:
Cut your red cardstock to 4 3/4 x 6 3/4 to create the large mat
Cut the High Society paper to 4 1/2 x 6 1/2
Cut red cardstock to 3 3/4 x 2 3/4 to create small mat
Cut image to 3 1/2 x 2 1/2
Create two rolled roses. I used the CTMH Artiste Cartridge and then inked them using Tattered Angels Glimmer mist in scarlet and cranberry.
Adhere large red mat to base.
Adhere design paper.
Arrange flower spray and paper roses and adhere to card.
Adhere focal image to small mat and attach to card using foam squares.
Insert hat pins under the edge of image or spray and adhere.
Using a fine tip glitter glue, trace the flourishes on the design paper.
Aren't the challenges on Gecko Galz so much fun. I wish that I had known about them sooner as I am having a blast creating all these new styles. This challenge was of course a Christmas Challenge. I really like the way it turned out. I find challenges that don't limit colour choice are much easier for me.
Material Used:
Gecko Galz Oh Christmas Saying OCS09
Do Crafts Denim Lace
American Crafts Cardstock
Close To my Heart Colonial White Card Base
Close To My Heart Artiste Cricut Cartridge Rolled Rose
Ebay Leave
Old Paper Distress Ink
Crayola Pencil Crayons
Spectrum Noir Alcohol Markers
Stickles
Flat Back Pearls
I always start by colouring my focal image. It sets the tone for the whole card. Depending on the colours that come out of it determines what supplies I will use on the card.
Double mount the focal image on dark and then lighter blue cardstock creating a 31/2x31/2 square.
Cut a piece of cream cardstock 4 1/2 x 3 3/4 (I ran mine through my cuttlebug to add some dimension). Ink the edges with Old Paper Distress ink and attach it to a piece of dark blue cardstock.
Attach the blue lace to the blue and cream layer, securing the lace on the back with a piece of tape. Attach the layer to the card base.
Using Foam squares attach the focal image to the card base. Be sure to add a bit of extra pressure where the foam squares attach to the lace.
Arrange your leaves and rolled flower to the bottom left corner. Add three half back pearls to the bottom right of the focal image.
Admittedly I rarely work in gold. Its just so flashy and I tend to lean...bend...hang right over on the muted vintage coloured side of things. It is always fun though to pick up a challenge and run with it. You would have laughed if you had seen my husband's face when he came home from work and saw the gold foil card on my bench. I think he wondered if I was having a midlife crisis. Truly, that's how predictable my colour palette is.
Materials:
The card is 5x7 and I used a card base from core'dinations.
Colonial White Cardstock from Close To My Heart
Gold glitter mac tack from the dollar store
Berry Sprig from the dollar store
Cream Coloured Lace from Do Crafts Madame Payrauds collection
Focal Image Gecko Galz Angelica Stamp A06
Green leaves from ebay
First I coloured the image using a combination of coloured pencils and spectrum noir markers. I like the contrast that you can create with the shiny gold pencil crayon and the deep blue inks.
Once the image was coloured I set it aside for a moment and took the gold foil and attached it to a 51/4x 31/4 piece of cardstock. Trim the focal image to 5x3 and adhere it to the foiled cardstock.
Next I cut a 5x7 piece of cardstock and covered it with foil. You could put it directly on the card base if you are brave. I am not, so I used the extra cardstock. Cut another 6x4 piece of cardstock and and mount it to the gold foiled piece. Attach these to your card base.
Cut a 5 inch piece of lace and layer it on the left hand side of the card.
Using foam squares attach the mounted focal image to the card base.
Arrange your berries and leaves in the bottom left corner and you are done.
Its time for Christmas gift projects at the library already. Whoosh where did the time go? This year I really wanted to do some type of mixed media project but as we are limited to 2 hours for the class I was a bit stumped. Luckily I spoke to Vicki Gee at a crop last month and she helped me work the details out in my head.
Don't you just hate it when technology issues mess with your plans. For whatever reason blogger would not publish yesterday. I tried well into the night and no luck. I decided that the best thing to do is combine the two posts (yesterday's video and today's project.) So it will be like getting to watch a whole season of your favourite show on Netflix. Ha. Well close enough.
This is the video showing the Heartfelt Creations Stamps and Dies that arrived yesterday.
This is the project we are working on tonight in our scrapbook club.
Supplies Used:
Twig & berry Paper Collection (Kaisercraft)
Twig & Berry Diecut Pack
Heartfelt Creations Sparking Poinsettia Stamps
Heartfelt Creations Sparkling Poinsettia Dies
Ruby Rock It Christmas Ribbon
Close to My Heart Ruby, Barn Red, English Ivy, Ponderosa Pine and Honey Inks
Ground Espresso Distress Ink
Flat back gems from Ebay (I paid 24 cents and it was free shipping)
We don't have satelite or cable at our house because I felt it influenced the children too much and put them into the whole commercialization loop. Somehow though I don't seem to apply the same principle to my own viewing habits. I watched a video from Heartfelt Creations the other day and ended up ordering all the supplies that they they used. I could not help myself, I had to have it.
Here is my shopping list from the other day:
SPRK POINS-CUT & EMBOSS DIES
SPRK POINS-CUT & EMBOSS DIES
LARGE PNST-CLING RUBBR STMP SET
SPRKL PNST-CLING RUBBR STMP SET
PNST NOTES-CLING RUBBR STMP SET
SPRK POINS-HEARTFELT PAPER COLL
Thats right, I purchased both sets of dies, the coordinating stamps, the background stamp and the paper collection. Now I am stalking the UPS guy because I can't wait to get my hands on my new toys.
This is the video that did me in.
I am hoping that the delivery will arrive before Thursday so that I can incorporate these beautiful flowers into our club layout this week. We will be working with the "Twig and Berry" collection from Kaisercraft.
Late last night I was inspired when a mini canvas fell off my bench and onto my toe. Hey some people are inspired by apples hitting their head...for me a good swift knock on the toe does just fine. I made the decision that I have too many half finished projects lurking in my studio. One would think that I would have come to that conclusion before hurting myself, but potato p-a-t-a-t-o. I got out my Prima Doll stamps and an old pad of DCWV paper, a few Prima flowers and flourishes and some Basic Grey Rub Ons and Voila....my mini canvas masterpiece was born.
Here is what I did:
I had previously painted the canvas a blotchy mix of pink and white acrylic paint.
I sanded down some of the areas of the canvas so that the texture showed through.
I used the white rub ons and my bone folder to put the flourishes in the upper centre to right side of the canvas, trying to have as much show through were I intended to place my doll.
Using a plain white paper doily cut in half I created a half moon on the right centre of the canvas.
I had some Prima Say It With Crystals flourishes in the studio so I used one in the top left .
I had some left over scraps of a crocheted doily from our club layout from a few weeks ago so I used it to create a sort of base to ground all the elements at the bottom of the canvas.
Silver filigree and some pretty Prima flowers were added to the crocheted doily pieces.
Using the "Always be your own kind of wonderful" stamp from Close To My Heart, I stamped my sentiment with black Memento Ink and then coloured it with cotton candy ink (which I applies using a makeup sponge).
I popped the sentiment up on foam squares and then finally adhered my pretty Prima Doll. She is inked using Tattered Rose Distress ink.
Thats It. As my little guy would say "easy peasy, lemon squeezy".
The second mini that I created with the paper was actually the one I started with. I loved the whole idea of the teapot shape and the cute embellishments. Somewhere though along the way I lost my mojo on this project. Luckily I have great inspiration on tap from the Facebook Group 4 Gs (Girls, Grins, Glitter and Glue) They came up with some brilliant additions to finish this project off.
Here is where it sits now:
Don't mind the shaky hands. I have an anxiety disorder and sometimes I am a bit shaky. Also I saw on a video by Crafter 45 once that people are distracted by wounds that are unexplained. The scratches are from my big sucky King Shepherd Titan who thinks he is a lap dog. At 120lbs I beg to to differ with him.
I admit that I am a paper hoarder. Honestly though, if you are going to be a hoarder, don't you think scrapbooking supplies is a wonderful thing to collect? This week, well the last couple of months on and off really, I have been enjoying the fabulous Fabscraps High Tea Paper Collection. No really, I bought the whole collection.
Uhmmmm, two of the collection really but who's counting. I love the theme (come on High Tea...My Grandma's Teacups) and the designs are so beautiful. I have only worked my way through a small portion of the first kit and have already created two really fun mini's. This is the first. It is an 8x8 chipboard mini.
Oh my goodness, I swear I think I am losing my mind. I had intended to put these pictures up on the blog last Friday. I don't know where my mind is these days. In a positive light, I am getting them posted prior to Christmas so that is a plus. We were working with the Docraft Ultimate Vintage Diecuts Pack (sorry its sold out). There are 60 pages of vintage images in this set. We have decided to use it over 3 clubs as there is just so much in this kit. We also used the cream, textured 5x7 card bases from Anita's. This is the first time I had purchased these cards and they are really good quality.They come in a package of 20 cards and envelopes.
We made 10 cards total. 2 each of 5 designs.
We used a little bit of glitter glue and a pinch of glittery washi tape to glam up the cards. Some of the ladies also used embossing folders and distress ink. The card with the Angel is best completed using medium thick foam squares. My first one had really thick squares and it was really bulky looking. Our next card club is not until the end of November so you will have to check back to see what else we cook up. In the meantime be sure to follow my Cardmaking board on Pinterest for lots of inspiration for your own cards.
One of the absolute best parts of having a craft business is that you meet the most talented people. The other day I was fortunate enough to have Denise Marchetti in my studio. Denise was telling me about this amazing calendar that she had created using her Prima Stamps. I was intrigued and she promised to share pictures of her masterpiece as soon as possible. Well guess what, she sent them to me Thursday. So knowing me as as you do, of course it took me until now to to get everything organized to share them.
Here we are: Denise Marchetti's Prima Doll Calendar.
January, is birthday theme as my daughter and granddaughter are both January babies I used anything I had on hand that would go with my theme.great idea to use scraps and from your stash!
February: Valentine's Day
March: Easter is in March 2016
April: Vacation theme
May: Bring in May flowers from stamps I have
June: Used stamp of the month from close to my heart and SU lovely as a tree
July was paper piecing to create a scene at the beach
August is stickers from leftover packages I had
September is back to school
October: My favourite one is large spider web stamp embossed with black and then spiders are from die and so are pumpkins
November: Leaves falling (some distressing and inking)
December: Waiting for Santa santa in window is fussy cut from paper and then place behind acetate and then window die cut.
I used copic for most skin tones but 2 are done with watercolours.
Thank you for sharing your beautiful calendar with us Denise. It is wonderful to have a chance to see the versatility of these adorable stamps.
When you have a blog you tend to read a lot of information about blogging. Its so much more than just typing random thoughts onto a blank white screen and hitting publish. Well, for some people I guess that is what they do but I am interested in the actual art of blogging. You know the creative process wherein other people invest themselves in your content because they feel that you are providing them with value, knowledge, inspiration and sometimes just a smile. This post I hope does the latter.
On Saturday I packed up my 1/3 of my craft store and hit the road to be a guest at the crop of Angie McColeman in Kingston. I agonized over what would be the best selection to take to show all the talented croppers in attendance. I must have packed 6 times to get ready. A little Graphic 45, a little Julie Nutting, a splash of Kaisercraft so the ladies could recreate our Magnolia Grove layout from last week....I even took a couple of Colouring Books for Adults. As a last minute idea I threw in my box of fabscraps chipboard pieces which turned out to be a huge hit.
I took a quick glance at google maps thinking that I knew whereabouts the crop was being held. By 8 am I was packed and ready to leave. My hand packed lunch that my 12 year old son provided for me in hand. By 8:12 I had my copilot picked up and loaded. We were off on another whirlwind adventure.
Well, as it turn out I did not know where I was going as well as I had thought I did. We ended up somewhere north of Odessa at a lovely Free Methodist Church. The parking lot was filled with well dressed ladies....that tipped me off that perhaps I had taken a wrong turn in Albuquerque (is that a real place) No offence ladies but we all know we dress for comfort when we are heading to a crop and this high heal wearing, matching scarf and purse crew seemed a bit to put together to be planning on spending the day playing with paper. I consulted with my cohort and we decided to seek assistance from our friend that was already at the crop. Of course she was too busy cropping to check for our SOS texts. We resorted to asking the first person that walked near enough to hear our pleas to give us directions to our destination in Kingston. She actually pulled out a paper map which honestly I don't think I have actually seen anyone use for directions in years.
Thankfully it was a short jaunt to get us back on track and we managed to make it to the crop a mere 15 minutes late.
We were welcomed with such warmth and hospitality that I wondered why it had taken me so long to decide to make the trip. It was a wonderful day of chatting with such creative minds. I felt like my craft tank was overflowing with inspiration. I also made some wonderful connections with local crafters that will be guest posting their projects on the blog. Yay for us!
The very best part of the day was reconnecting with a dear friend that I had not seen in years. I forgot how much I missed chatting with her.
This wonderful experience has motivated me to take my little shop on the road more often. If you are looking for a mobile craft store for your next crop give me a holler. I would love to get out and meet all my you crafty ladies.
This article contains affiliate links which if you purchase the product I get a small commission.
Last week my new collection of Spectrum Noir Markers arrived. All except the cool greys which are on backorder....I guess a lot of people are busy drawing the dreary skies. I was unsure whether I would like them as well as my Copic markers or my ShinHan, but now I am convinced that this is the maker collection I have been dreaming of. You dream of markers too right, it's not just me?
#1 There are all these beautiful colours to use
#2 The reinking system is so easy
Each bottle has a dropper cap and will refill pen at least 5 times.
#3 You can get different styles of nibs to suit your colouring style.
These next generation replacement nibs fits in the chisel nib end of the Spectrum Noir markers.
#4 They are less than half the price of Copic and ShinHan Markers
#5 They offer free instructions and video tutorials to get your accreditation. This is very cool as it costs allot of money to take the courses you need to get Copic certified. They give you a certificate and a blinky to show off on your blog.
They feel really nice when you work with them. They are large enough that you feel like you have good control while you colour and the grip is very comfortable. I really like the nibs that come with the pens so i am unlikely to switch to the brush nibs. The colours are deep and vibrant and the colour palette is wonderful.
I don't regret switching over to the dark side at all and I don't think you will either.
So yesterday's post was discussing using your cricut cartridges to find cute accessories for your Prima Dolls. I was so excited to share the post I forgot to include some of the finished dolls. That happens to me sometimes. My excitement gets ahead of me and and I push the publish button too soon.
So here you are without further adieu, my Prima Paper Dolls: Accessorized.
I know its not nice to play favourites, but I am so in love with how this one turned out. I love the parasol.
They are all listed in my ebay store. I have to keep letting them go so that I have room to make more.
Well, did you get your Prima Paper Doll Stamp all set up in your Cricut Explore? Of course you did! I knew you could do it. If you need to go over what we did this is the link. Now comes the really fun part. I hope you remembered not to drink your coffee near your precious paper.....oh the horror....but that's another post.
Making Your Prima Paper Doll
You know that plastic 12x12 box that you use to collect all those teeny time pieces of paper that are just too good to throw out. Yah, the one on the shelf collecting dust. Go grab that. This is a great opportunity to put those itty bitty scraps to work. (and your husband said you would never need them......be sure he sees you using them, as though you had this planned from the start....seven years ago when you began saving scraps of paper.)
For the small layers like the dress, shoes and stockings I try to find scraps that coordinate in the approximate sizes I want.
You will need to use large pieces for the doll base and backer.
Small confession. I made a horrible paper choice for this project as I chose a slightly shiny surface that does not hold the ink well. A flat finish would have worked much better.
Remember to think about where the shadows on the dress would fall. The area that flares gets the most light and the creases are darker.
I used a wet glue. I just find it easier than messing with popdots or foam squares. You can choose your favourite adhesive and I won't judge you harshly.
As our friend Rosiland Burch taught us earlier this week. A girl's accessories are very important. So go ahead and bling her up. Then we are done. Yay, see how much fun they are!
Be sure to follow my Prima Doll Pinterest board for plenty of inspiration on ways to use these adorable creations.
So it's no secret that I am totally crazy about Prima Marketing's line of Julie Nutting Dolls Stamps. It seems I talk about them allot....ok...really really allot. But they are so fun to make. Some of my friends were less then excited about the stamps because they did not enjoy spending the time cutting out the multiple layers that make these dolls come to life. This diminished my joy somewhat as I wanted everyone to love them as much as I do.
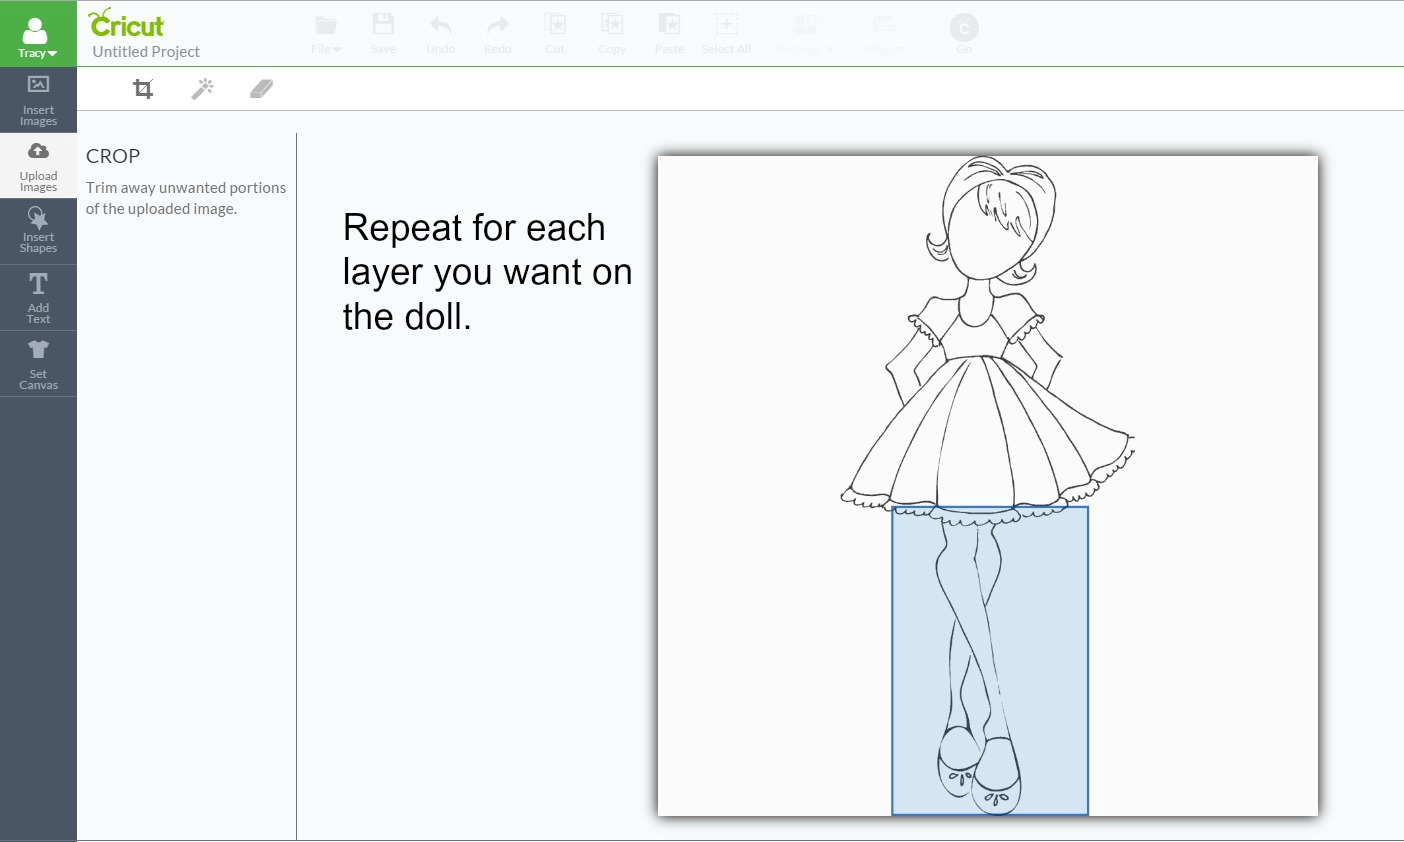
Then one afternoon it struck me (not literally) but I figured out that if we eliminated the fussy cutting around the various layers the ladies could just enjoy the process of stamping and colouring the dolls. Bravo, I have my moments of brilliance. So I set to work creating cut files for my Prima Dolls. Some people will be aghast that I would suggest this. I am aware that some people will use this technique for evil and do the print then cut but I need to remind those folks not to get too excited because that feature only works on white paper. So follow along with the doll stamp of your choice. It;s a long process but you will only need to do it once and then you will have years of enjoyment dressing up your creations.
So the first step is to get an image of your stamp:
You could be very ambitious and scan your stamp or you can just google the stamp and borrow an image to use.
Now then, time to get to work. Log into your Cricut design space and start a new project.
Select all the layers for your doll and bring them into your design space. You may notice a few extra specks you missed when erasing. Take a moment and clear them up using an extra shape and the slice tool. This also works to straighten up any wiggly parts that you did not get a perfect image of. ( I get this allot because I have shaky hands). Remember to work with a duplicate of the piece you are working on so that you can have a fallback if something goes wrong.
The rest of the tutorial will be in the post on Thursday!
Some posts on this blog contain affiliate links. I receive a small commission whenever a product is purchased through these links. All opinions expressed on My Grandma's Teacups are solely my own, and I only suggest products or services that I believe will be helpful to you, readers.


