

Making Prima Julie Nutting Doll Stamps Easier with Cricut Cut Files (No More Fussy Cutting!)
Why this game-changing tutorial is getting crafter clicks worldwide
So it’s no secret that I am totally crazy about Prima Marketing’s Julie Nutting Dolls Stamps. I mean — I talk about them a lot… okay, really, really a lot. But they bring me such joy! They’re whimsical, expressive, and perfect for cards, scrapbooks, tags, journal layouts, planner spreads… You name it.
But not everyone shares my undying love for fussy cutting all those tiny layers.
Why This Matters: The Pain Point Every Crafter Knows
Some of my crafty friends were less than thrilled about cutting out the myriad tiny pieces that make these dolls come to life. They liked the look of the finished product, but the process? Not so much. I get it — spending time with small, fiddly pieces isn’t everyone’s idea of creative zen.
And let me confess something: that diminished my joy a bit. I wanted everyone to love them as much as I do!
But then — and I know this sounds dramatic — one afternoon it struck me (not literally, promise): what if we could eliminate all that fussy cutting? Imagine enjoying the fun parts — stamping, coloring, styling — without the stress of cutting out 20–30 tiny pieces.
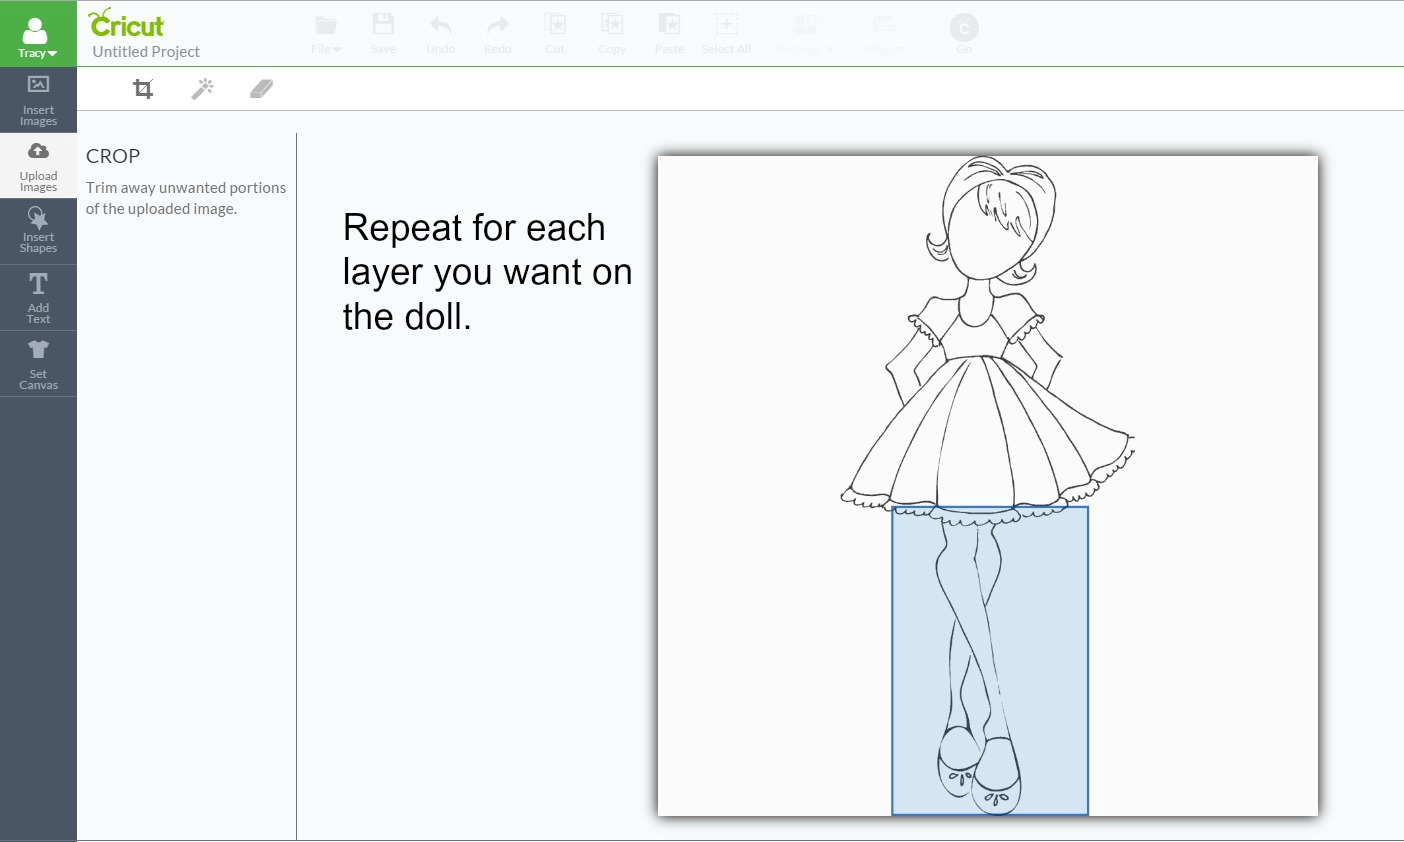
Cue the lightbulb moment: I could create cut files for Cricut that match the Prima Julie Nutting dolls, so anyone with a cutting machine could cut the layers quickly, cleanly, and perfectly every single time!
This tutorial shares exactly how I do it — step by step — so you can fall even more in love with your doll stamps.
Craft Trend 2026: Cut Files & Stamp-Ready SVGs
Here’s something cool: in the paper crafting world right now, there’s a mega trend — digital cut files paired with traditional stamping. People are searching for phrases like:
- "Cricut cut files for stamping projects"
- "SVG files for Prima Doll stamps"
- "How to make cut files from rubber stamps."
- "Stamp and cut workflow in Cricut Design Space."
These long-tail keywords aren’t just SEO fluff — they represent real crafters searching for real solutions every day.
Step 1 — Get a High-Quality Image of Your Stamp
Before we even open Cricut Design Space, we need a clean digital image of the doll stamp you want to turn into a cut file.
Option A — Scan Your Stamp
If you have a scanner, this is the best choice. Scan at 300 dpi or higher to capture crisp details.
- Grayscale or color? Color works fine.
- Use a white background for easier tracing.
Option B — Find a Digital Image Online
If you don’t have a scanner, you can Google the stamp name + "Prima Marketing Julie Nutting Dolls" and grab a clean image. This works best when the stamp is photographed against a plain background.
Quick reminder: If you use an image you didn’t scan yourself, make sure it’s clear and high-resolution — otherwise your cut file won’t trace well.
Step 2 — Upload Into Cricut Design Space
Now log into your Cricut Design Space account and start a new project.
Take a deep breath — this step is exciting!
- Click "Upload" and bring in your scanned stamp image.
- Choose "Complex" when prompted (this gives you the best trace quality).
- Use the Remove Background tool to clean away anything that isn’t part of the doll itself.
- Hit Apply.
You might notice a few specks or tiny stray marks — that’s totally normal. We’ll clean those up next!
Step 3 — Clean the Image Using Shapes & the Slice Tool
This is where the magic happens.
Even the cleanest scans usually have little artifacts — tiny dots, stray lines, or rough edges. Here’s how I refine them:
Duplicate Everything First
Before you do any cutting or slicing, duplicate your image. Why? Because things can go sideways! With a duplicate, you always have a safe fallback.
Use Basic Shapes to “Erase” Imperfections
In Design Space:
- Add a square or circle
- Place it over the tiny speck you want gone
- Select both the shape and the image
- Choose Slice
Boom — the speck disappears with surgical precision. This trick also helps if the outline of your image is a little wobbly. Place a shape over that section, slice it out, and redo it cleanly. Remember — work on a duplicate piece so the original stays untouched.
Step 4 — Trace to Create the Cut File
With your cleaned image selected:
- Click Image Trace
- Adjust the Threshold slider until the trace lines look smooth and complete.
- Hit Apply
- Click Save as an SVG
Now you have a cut file ready to use! 🎉 You’ve successfully created your very own cut file from a stamp image!
Step 5 — Cutting the Layers with Your Cricut
Now that you have the SVG:
- Insert it into your new Cricut project
- Resize to match the approximate size of your stamped image
- Ungroup the layers if necessary
- Assign each layer a color so you know which cardstock to cut
Pro tip: If you’re doing a stamp-then-cut workflow, keep in mind this only works perfectly on white cardstock in the newest versions of Cricut Design Space. Most of us color our stamped images first anyway, so it’s usually not a deal-breaker!
Step 6 — Stamp, Color, and Assemble
This is the fun part — the part we’ve all been waiting for!
- Stamp your Julie Nutting doll onto cardstock
- Color with your favorite mediums (Copics, markers, colored pencils, watercolor — whatever you love!)
- Bring in your Cricut-cut pieces and layer them on top of the colored image
- Add any fun accents — glitter, enamel dots, ribbons, stencils
This is where your dolls truly come to life.
Why This Workflow Changes the Game for Crafters
Paper crafting should be fun, not frustrating. This technique:
- Saves countless hours
- Eliminates fussy cutting frustration
- Helps even shaky-handed crafters succeed
- Makes projects look cleaner and more professional
- Works beautifully with mixed media techniques
Best of all? Once you make a cut file for one doll, you can save it and reuse it forever. No more repeating tedious work. This is the kind of crafting efficiency everyone is searching for.
Frequently Asked Questions (So Many Crafters Ask These!)
Can I use this with other stamp brands?
Yes! This method works with almost any stamp, as long as you can get a clean digital image.
Do I need an expensive Cricut machine?
Nope! Even the Explore series handles SVG cut files beautifully.
What if my trace isn’t perfect?
Try rescanning at higher DPI, or use a slightly cleaner source image. Small fixes with shapes + slice can get you there every time.
Can I sell the cut files?
Always check the stamp manufacturer’s digital rights. Many crafters use their files personally, but if you plan to sell, make sure you’re using images you created yourself (like scans).
Crafting Inspiration & Trendy Ways to Use Your Doll Projects
This cut file technique opens the door to so many creative projects:
- Doll tags for gift wrapping
- Planner dashboards
- Junk journal elements
- Interactive card layers
- Mixed media art panels
- Pocket scrapbooking cards
Right now, crafters are searching for:
- "Cricut stamp cut workflow tutorial"
- "Prima Julie Nutting cut files free download"
- "Best coloring tips for stamped images"
- "SVG cut files for handmade cards"
People want solutions, and this tutorial delivers.
Final Thoughts — Yes, You Can Love This as Much as I Do
Some people will cling to traditional fussy cutting like it’s a badge of honor. And that’s totally fine. But if trimming tiny parts stresses you out, this method gives you an easier, cleaner way to enjoy the part you love most — the art.
You only need to create these cut files once… and then they become tools that unlock creativity every time you craft.
So go ahead: choose your favorite Julie Nutting Dolls stamp, fire up Cricut Design Space, and follow these steps. I promise you’ll be smiling by the time you’re gluing down that final layer.
Happy crafting!
mygrandmasteacups.blogspot.com
So the first step is to get an image of your stamp:
You could be very ambitious and scan your stamp or you can just google the stamp and borrow an image to use.Now then, time to get to work. Log into your Cricut design space and start a new project.


Select all the layers for your doll and bring them into your design space. You may notice a few extra specks you missed when erasing. Take a moment and clear them up using an extra shape and the slice tool. This also works to straighten up any wiggly parts that you did not get a perfect image of. ( I get this allot because I have shaky hands). Remember to work with a duplicate of the piece you are working on so that you can have a fallback if something goes wrong.


Go Ahead, Its already posted
Join the MGT Community
Don't miss a single paper crafting tutorial, bookish layout, or gift guide. Subscribe to My Grandma's Teacups to get our latest heritage inspiration delivered straight to your inbox.
Subscribe & Get the Freebie Kit

