Showing posts with label #colouring ##scrapbooking #cardmaking. Show all posts

Sunday 8 May 2016

Happy Mother's Day and a free digital stamp from Gecko Galz

Happy Mother's Day to all of your wonderful women out there. This post will be brief as it is in fact Mother's Day that I am writing it as I have had some issues getting my network to cooperate with me this week. It took just over 35 hours to upload a youtube video...bleh.

This is my Mother's Day layout. Enjoy!


Here is your free image from Gecko Galz:


Thursday 28 April 2016

Local King Rubber Stamps: You've got to be good to be King


From my very first trip to Scrapfest, way back when, I have always made sure that I stopped to watch the art in action at the Local King Rubber Stamp booth. Back then it was just stamps. I even remember that she was using crayola markers and her stamps to create breathtaking mini pieces of art. I could sit and watch her over and over as she dabbed the stamps in a nonchalant way with her markers, huffed on them and then applied the image to the paper. I was mesmerized.  I say "she" as I could never remember the name of the lady that did the stamping.

This year I was amazed at the change and advancement of the product line. Stamps, matching dies, background stamps, markers and acrylic blocks all of which are so on trend right now thanks to the popularity of the Heartfelt Creations and Sizzix stamp and die combos. This year there was a make and take. I admit I missed watching the artist at work, but creating my own image was enough to get me in the buying spirit.

The difference in Local King Rubber Stamps is that they are not line art. They are reversed. Much like the two step stamps that have become so popular, but without the ...well...2nd step. You literally use your water based marker directly on the stamp and once it's stamped onto the paper, it's done.


These were my purchases from the show:


Tuesday 26 April 2016

Admiring the Diecuts from Southern Ridge Trading Company


One of my favourite finds from Scrapfest this year was the incredible diecuts from Southern Ridge Trading Company. I was amazed at the finite detail that Karen was able to obtain in her designs. 

I decided to start on the other side of the auditorium and by the time I made it to Karen's display there were already many empty boxes where customers had stocked up on the oh so cute embellishments.

These are the items that I bought and I am itching to get creating with them. In fact I fell so deeply in love with these designs I applied to become a design team member (fingers crossed) and I am going to stock some of the designs in my store. Feel free to get me to order in any you would like from Karen's site.


Saturday 23 April 2016

Still Catching My Breath From Scrapfest in Kitchener


I know these pictures are far overdue but I have literally not had a moment to sit at my computer and put a proper post together in weeks. I love these pictures of my partner in crime Juanette Fillery and I.

As I wrote in a post last year, I have been unable to attend Scrapfest for several years. It had become for me another huge hurdle that I just could not overcome. I was afraid returning to Scrapfest would hurt too much, make me remember how much I miss my friend Rebecca who used to attend with me every year.
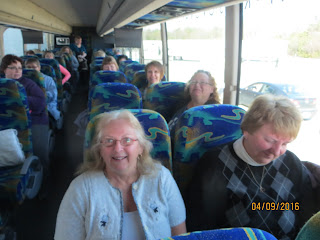
I know that Rebecca was watching over us on April 9th as our bus load of fabulous ladies hit the road to Kitchener. I was so blessed that Rebecca's mother-in-law decided to come with me. I think it was good for both of us to make the return together.

A big shout out to Nicole at McCoy transportation who opted to upgrade our bus rather then take any risk with a bus with a minor issue. We loved the extra space (more room for our shopping treasures). Our bus driver was a hoot.


Lisa Sales-Furtney was a wonderful hostess, as always, and made each of us feel like VIPs. Her sense of humour kept us all in stitches. She even came as we were leaving and checked out the bus. We wanted to keep her but were promised that we will see her again soon.


There were so many beautiful displays this year. Everyone went all out to make the event a huge success.

Some of my favourite stops were Kraftin Kimmie Stamps, Southern Ridge Trading Co., Local Kings Rubber Stamps, Frog's Whiskers, Scrapping Turtle....there were so many this is just the short list.


I will be posting the goodies that I purchased while I was there throughout the week.

We are already planning our road trip to Kitchener for next year. Give me a call if you want to get in on the adventure.


One of the highlights of my day was grabbing a photo with Creative Scrapbooker Magazine's Publisher Katharina Doyle.

Saturday 19 March 2016

Girls, Giggles, Glitter and Glue Spring Blog Hop


Welcome all Blog Hoppers!!!!

There is nothing like some beautiful new Spring artwork to get your crafting mojo going. I hope you are having fun visiting all the talented ladies of 4G. They are my inspiration every day. You never know what beautiful creation they will come up with next. You have probably already made yourself familiar with the rules, but just in case I am the first stop on your travels I have posted them here for you as well. Remember to check in at the end of the hop Girls, Giggles, Glitter and Glue Event Page.


Here is my Spring Project! I have been working on this forever it seems. I used cold porcelain to make the roses, leaves and tree stump. The little fairy (who was very camera shy it seems, is a digital download from Gecko Galz. The mirror base and glass are from my favourite spot....Dollar Tree. Enjoy!


I tried this colour technique so you could see the little fairy peeking from behind the branch. She is just the cutest little thing with her sparkly wings and arms filled with pink roses. 


I used the cold porcelain recipe that I shared a few weeks ago to create the decorative top and the base of the tree. I loved how I could use my plastic greenery and wrap the clay around it to create the tree. Not so easy with oven bake clay. By adding Tattered Angels Glimmer Glaze to the dried pieces I was able to achieve a finish very close to a kiln fired piece.

This piece was time consuming only because I worked in small steps allowing the clay to dry before moving on.  I used the Craft Medley Premium Glue from the Dollar store to hold the clay to the base and the glass. It is secure enough to lift it using the leaves.


a Rafflecopter giveaway


Rules:

Welcome to the 4G's Spring Themed Blog Hop! We hope you find inspiration in the projects our members have shared. Please subscribe to each channel or blog and then comment on each project and letting us know that you have subscribed for a chance to win prizes. Winners will be announced on blog pages and channels on Monday, March 21 so be sure to check back to see if you're a winner. If you are not a member of our group (Girls, Giggles, Glitter, and Glue) please PM Dawnette Cress on Facebook. We welcome new members always. Thanks for hopping!

This blog hop will be spring themed and will be for two days - Saturday, March 19 and Sunday, March 20. The line up is below for both days . There will be prizes given to those who complete both days of the hop (must comment on each blog visited). Each blogger will be selecting a winner, the day after the hop, from those who have met the above requirements.


There may be additional entries given to those who "like" and/or "subscribe" to each blog. 


TO BE ELIGIBLE TO WIN A PRIZE, YOU MUST:


***Complete the hop - visit all blogs/youtubes and comment on each one
***Come back to this event page, no later than midnight PST on Sunday, March 20 and tell us what your favorite 3 projects were in the two day hop

Here's the line up:


Amanda Rhodes: http://salnclts76.blogspot.com/
Kim Norman: https://youtu.be/bho-n2TodyI
Christy Lepine: https://youtu.be/3UE8NPiSH9A
Tracy Sagriff: http://mygrandmasteacups.blogspot.com/2016/03/4gspringbloghop.html
Laurie Moore: http://mooreartfromtheheart.blogspot.com/2016/03/4gs-spring-theme-blog-hop.html

Sunday, March 20 ----

Michele Quam: www.Chelmariescreativecorner.blogspot.com
Germaine Fryc: https://www.youtube.com/watch?v=TVl33DV8kGA
Latanya Townsend-Poelinitz: https://www.youtube.com/user/Poelinitz1
Paula Driver: http://scrapyourworld1.blogspot.com/


Your Next Stop in the Blog Hop is Laurie Moore: http://www.mooreartfromtheheart.blogspot.com/

Monday 14 March 2016

Gecko Galz Papercrafting Challenge:Moo??????

This is my sample for the Gecko Galz Challenge for March which required the creation of a MOO. This of course required a google search on the topic first to see what in the world a MOO was. I have become acquainted with ATCs, inchies, and twinchies but this was my first MOO ever.

Moo - 1-1/8" x 2-3/4" rectangles
Wasn't that helpful? I searched the forums and that pretty much sums it up. They are attributed to the tiny business cards made famous by the print company MOO. Makes sense right.

Here is my first attempt at a MOO. It was challenging to decide how to use the precious space available.

I don't believe I have said MOO this many times since reading my little ones Mr Brown can Moo can you, by Dr Seuss. I have a feeling that book may make a comeback at storytime tonight.

Ok, so get out there and create a MOO. Its just as much fun to make as it is to say. Be sure to share your pictures. MOOs are meant to be shared.

Monday 7 March 2016

Easter Decoration using Gecko galz Ephemera

Do not be surprised if you see this adorable little guy on several projects this month. I think he is just the cutest little bunny ever. No offence to the other bunny I am working with for my March Feature project. I seem to never tire of colouring this sweetie. 


How to:

I printed the image from Gecko Galz on regular white cardstock then coloured it with my Spectrum Noir markers. You will remember that you have to be careful when colouring inkjet images with alcohol markers (for my technique see the post about my art journal found here).

I cut the Christmas wreath using my Cricut and then covered it with leaves and flowers from the Flower Shoppe Cartridge. I cut the leaves out in green bazzil cardstock and then added shading using my distress inks and Spectrum Noir markers. 

The ribbon was lighter than I would have liked but I am giving up buying craft supplies during Lent. My husband wishes Lent would last all year long.

The adhesive backed "pearls" were a Dollarama buy. They come attached by glue in long strings which is handy when you are making flourishes etc. By the time I had separated them I had to use a bottle of glue as they were no longer adhesive backed. My studio table was sufficiently covered in the adhesive though. 

Finally,  I added a bit of green glitter glue and a hand written sentiment. Nothing feels finished until it has a bit of glitter! 

Friday 4 March 2016

Share Your Creativity Photo Contest

Sometimes it feels like I am posting all about me." Look at what I have learned.""Look at what I have made." Blech. I wanted to find a way to tell you all thank you! For the millions of things you have all created that have inspired me, instructed me and even made me stretch out of my creative comfort zone.

I wish I had a huge multinational company so that I could send a thank you gift to each of you. Unfortunately, that is not the case....yet ;) So instead I am hosting a contest for you to show off your favourite papercrafting creation. It's ok if its a card, scrapbook page, tag, atc, canvas,,,,you are all inspiring to me. So grab your camera and get a shot of your work and submit it to the gallery link that I will post below. Next, share the heck out of it on all your social media. You will have until the end of March to get votes. The winner will receive a $25 Gift certificate to use at My Grandma's Teacups Craft Supply.

Here you go:Papercrating Photo Challenge

Thursday 3 March 2016

Gecko Galz Feet Challenge

I laugh even now as I am typing that title. I wonder how many hits this post is going to get from people with medical issues with their feet? I assure you, all the Gecko Galz are in fine shape. Just in case you are here looking for foot advice, you may want to try The Mayo Clinic Page.

Ok enough of the silliness, this crafting business is serious stuff. Well, not really, but I need to get to the point of the post before you all think I am totally off my rocker.

This was my sample for the February Gecko Galz Challenge featuring Feet! Yep, Feet! Mine likely won't qualify as I can't honestly say that there is a foot in this boot for sure...but I thought it was as close as I wanted to get to having a foot as the focal point of a design.

This ATC was created using kraft cardstock with archival black ink and a finbair stamp and then going over it with tea dye and rusty hinge distress ink. I then adhered the lovely vintage boot from the Ephemera Fun Collage sheet. I have a bucket of vintage buttons and these two made me think of the buttons that women used to have to deal with on long boots such as these. I attached a metal corner flourish, the buttons, a mulberry flower and a bit of glitter to give it a finished look. I stamped the sentiment using Colonial White ink and a Close To My Heart stamp. Voila. My ATC was complete. I hope you like it. Be sure to go and join the Gecko Galz Papercrafting challenge group. It is a great place to put your 'BEST FOOT FORWARD" get it...sorry that was sad.


Thursday 25 February 2016

Gecko Galz Pink and Blue Colour Challenge Sample

When you hear pink and blue do your thoughts immediately run to nursery decor? Once I got past that thought it was a pretty simple palette to work with. Gecko Galz has allot of vintage images that fall into that category. The challenge really was choosing just a few.

For this card I used the background paper from Bygone Days. I loved the soft flowy feel of the design. The two focal images came from the Beautiful Birds Collage sheet. Finally the sentiment is from the Close To My Heart stamp set "A bit of thanks".


Friday 5 February 2016

Gatefold Valentine Using Gecko Galz Ephemera

Here is another simple but high impact Valentine that you can create with very few supplies and very little effort.

What you Need:
Red Cardstock
Digital Image from Gecko Galz
Digital Design Paper from Gecko Galz
White Enamel Accents (or white paint)
Paper Flowers
Adhesive Backed Pearls
White Paper Doily

Tools:

Scoring Board
Bone Folder
Paper Trimmer
Heart shaped die and machine or scissors to freehand the Heart Cutout


How To:


  1. Using your paper trimmer cut a 12x12 piece of red cardstock in half. Set one piece aside to make another valentine if you so desire.
  2. Using your score board, score at the the 3 and 9 inch marks.
  3. Use your bone folder to give a nice clean crisp edge to the two folds as you bring them forward. You should now have a 6x6 card base with a cut down the centre front.
  4. Use your heart die or freehand cut a heart out of the centre front being sure not to cut through to back paper. Be sure to align heart so that it is perfectly even on both sides of the cut.
  5. Adhere a doily over the heart cut out space and carefully trim it to match the opening and also cut it so that it opens with the card.
  6. Using a scrap piece of cardstock cut a heart shape larger than your operning and then cut it again to create a hollow heart shape. 
  7. Glue the cardstock heart image to the left side panel only so that the card can still open.
  8. Decorate the face of the card with the white enamel or white paint.
  9. Adhere your flowers to the bottom of the card, ensure that they do not inhibit the card opening.
  10. Add some adhesive backed pearls around the heart.
  11. Cut a 53/4 square piece of design paper and adhere it to the inside of the card.
  12. Centre your focal image (in my case gecko Galz Ephemera) making sure it is showing properly through the heart cutout.
  13. Add any sentiment you wish to the inside of the card using stamps or pens.

  14. Once you get the hang of this card it becomes an incredibly easy card to create. It is a cute layout for any occasion.


Monday 25 January 2016

ATC Swap from Saturday's Crop

Today is actually Friday but I wanted to post the picture of the ATC that I will be taking to Angie McColeman's Crop in Kingston tomorrow. This is the crop that is held to raise money to support Angie's Kitten Rescue.  If you are still interested in supporting this worthwhile cause but can't make it to the event please message me and I will get you in contact with Angie.

I was surprised that so few ladies were able to take part but I am sure that the ones that do will do a wonderful job. I will share the other ladies work later on this week.

Here is mine.


Friday 22 January 2016

Word & Paintery Colour Challenge For January

The Canvas Corp Creative Crew was challenged to participate in a colour challenge with the design team from Words and Paintery this month. If you are not familiar with Words and Paintery, they issue a new colour pallette and phrase each month to inspire creative folk to stretch their comfort zone. You can read all about the January challenge and even take part for a chance to win some really cool crafty supplies. Visit here to check it out.

It took me awhile to complete my piece as I was struggling with the colours. As you know I am more a tan, pink, green kinda gal. It's all about trying new things though, so here is my entry.


Materials Used:

Canvas Corp. Brands watering Can (Owl and corrugated paper)
Tattered Angels Glimmer Mist (Sky, Riptide, Sea Glass)
Spectrum Noir Markers
Egg Image from Graphics Fairy
Leaves from Ebay
Ribbon from Ebay
Close To My Heart Liquid Glass
Ranger Black Enamel

Thursday 14 January 2016

Gecko Galz Art Journal...the video....

Sometimes I wonder if my pictures are able to get the fine details of a project across. I decided to do a quick video to showcase the Gecko Galz Art Journal that I posted last week. If you missed the post be sure to go back and check it out. There is a free stamp on that post courtesy of Gecko Galz.

Gecko Galz Art Journal: Go get the free stamp here!!!


Watch the video here.


Wednesday 13 January 2016

Canvas Corp Creative Team Supply Haul

Oooohhhh I am super excited to share with you the box of goodies that I received as part of the 2016 Canvas Corp Creative Crew. If you fall in love with this stuff, wait until you see the beautiful designs they launched this week at the Craft and Hobby Association Mega Show in Anaheim. There are so many new items coming my brain is filled with ideas.

This is my video of the unboxing. If you have not used Tattered Angels Glimmer Mists go out and get a few next time you are shopping. I suggest buying them at least in twos but preferably threes so that you can create shading effects. Much like our alcohol marker tutorials. you want a light, medium and dark shade. If your budget is a bit stretched after the holidays, I suggest getting a neutral colour like dazzling diamonds that will just provide a fine glimmer effect to your project.


Thursday 7 January 2016

January Gecko Galz Feature: Art Journal

Hello and welcome to everyone visiting me from the Gecko Galz blog. First of all I want to say how thrilled I am to be part of the 2016 Gecko Galz Design Team. The wonderful papers and images are entirely my style. The creative group of ladies that are on this team are so inspiring to work with. 2016 is going to be such an exciting year.

I decided to use the beautiful stamp that the Gecko Galz provided as a freebie for all of you. It was the perfect sentiment for the art journal that I was creating for 2016. I paired it with one of their other digital stamps from the Fairies Stamps digital stamp collection.


 I printed the images off separately on my HP Inkjet printer. I started with the Beauty and Truth stamp and coloured over the foliage and banner with pencil crayons. I then began shading with my spectrum noir alcohol markers being very careful not to allow the ink to saturate the paper so much as to smear the inkjet image. I found it works best to colour small areas in isolated patches and allow them to dry before colouring the adjacent spaces.

The incredible fairy image comes to life with just a few highlights on her dress and some bold blue on her wings.

After the images were completely dry I adhered the fairy to the sentiment and began highlighting using stickles in pink, green, yellow and silver.

Using some purple and white paint along with a bit of teal glitter paint I created a background on white cardstock.
 I adhered the cut out coloured image to the background and then used mod podge to add it to the cover of my art journal. Making sure all the wrinkles were our I gently dabbed an extremely light coat of Mod Podge over the entire image and background paper. Let me stress.....extremely light. Once that layer was dry I applied another coat of Mod Podge to the entire page.

Using some adhesive backed gems from the Dollar Tree, I outlined the image border and also the page border.

I am so excited to use this new journal for all my inspiration notes this year. Working with the ladies on the Gecko Galz design team, I am sure that it will be filled up in no time.

Be sure to grab the free stamp and also visit Gecko Galz store to purchase the fairies stamps collection.

If you love working with the Gecko Galz products be sure to show off your creations and get inspired by following the Gecko Gals Challenge group on facebook.

DIY Planner Pages: Cricut Explore Slice Feature and Gecko Galz Ephemera

Well we are finally coming to the end of this particular project. I hope you are feeling confident in your ability to use the upload and print then cut features of your Cricut Explore.

Today we will take those lessons and combine it with the Slice Feature. I have to tell you this is one of the most useful functions on the Cricut Explore. Having the ability to cut shapes inside other shapes makes it so easy to mass produce elements for classes and clubs.

Lets go back to our Cricut Design Space and insert one of the images from Gecko Galz that we have previously uploaded.

 Next you will want to select the shape that you are going to use for the planner page. I am using a cut from my Artbooking cartridge but many cartridges has page shapes you could use.

Click insert image, cartridges and the filter to your cartridges.

Select the shape that you think works best with your image. Choose insert.


Cricut Explore Air™ Machine + Ultimate Machine Set