
A Little Book for Christmas Memories: Brown Paper Bag Mini Album Base Tutorial


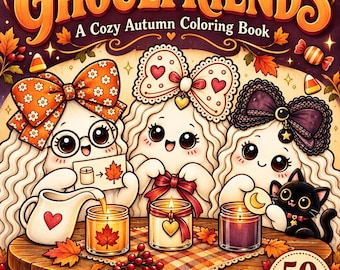
Elizabeth used images from our Best Ghoulfriends colouring book. Download the 50-page printable book and colour your own little autumn gathering.
Get Best Ghoulfriends on EtsyDigital download; no physical item is shipped.
Halloween is creeping closer, and our design team member Elizabeth Hart has given our little ghosts a delightful disguise! She has transformed ghostly colouring pages from Best Ghoulfriends into adorable focal images for her Halloween easel card. With cheerful bows, a cosy campfire and little ghosts standing up to join the fun, Elizabeth has created a scene that is far too sweet to be scary.

Adorable card design, colouring and photograph by Elizabeth Hart of Warm Harted. Ghost images from the Best Ghoulfriends colouring book by Tracy M. Robertson for My Grandma’s Teacups.
The campfire scene makes such a charming centrepiece: three bow-wearing ghoulfriends gather on logs, with pumpkins, a book and a black cat adding to the autumn fun. Elizabeth carries the scene onto the base of her easel card with extra stand-up ghosts, creating a lovely sense of depth.
Her Copic colouring brings the characters to life in warm oranges, fresh greens and golden autumn tones. Glitter adds sparkle to the bows and details, while enamel dots, patterned papers and the glittered Halloween greeting make the finished card feel like a little celebration.
I especially love the bookish ghosts. A cosy read beside a campfire sounds like the perfect way for our Best Ghoulfriends to spend an autumn evening!
Get our free printable book tracker and sign up for new reading-journal layouts from My Grandma’s Teacups.
Get Free Journal LayoutsSign up on our Kit page. Unsubscribe at any time.
All credit for this adorable easel-card design belongs to Elizabeth Hart. Thank you, Elizabeth, for showing us such a creative way to take colouring-book images beyond the page.
See Elizabeth’s original “Best Ghouls..” post on Warm Harted for her project photograph, creative details and craft-challenge links. Do pop over and leave her a little love!
If Elizabeth’s card has you reaching for your colouring supplies, you can find the Best Ghoulfriends printable colouring book in our Etsy shop. It includes 50 easy colouring pages filled with cute ghosts, cosy autumn adventures, pumpkins and bookish moments. Enjoy colouring the scenes, or take inspiration from Elizabeth and use your coloured images in your own personal paper-crafting projects.
Shop the Best Ghoulfriends colouring book on Etsy
This is a digital download for personal use; no physical book is shipped.
Would your ghoulfriends gather around a campfire, curl up with a book or head out for a pumpkin treat? I would love to hear what you would create!
For more design-team projects, printable crafts and cosy creative inspiration, join our My Grandma’s Teacups community.
The featured colouring book, plus more paper-crafting inspiration.
All products shown are digital downloads.

There is something so lovely about seeing a creative project come to life in someone else’s hands. Today I wanted to share Becky’s newest YouTube video, where she brings her own beautiful style, ideas, and creative energy to the craft table.
I always enjoy seeing how different makers interpret a collection or project. Sometimes it is the colours they choose, sometimes it is the little finishing touches, and sometimes it is simply the way they explain their process that gives you a fresh idea for your own crafting time.
If you are looking for a little inspiration, a cozy creative break, or just a few minutes to sit with a cup of tea and watch something pretty being made, this is a lovely one to enjoy.
Be sure to visit Becky’s channel, watch the full video, and leave her a little love while you are there. Creative encouragement means so much, especially when someone has taken the time to film, edit, and share their work with the rest of us.
Thank you, Becky, for sharing your creativity with us.

 Welcome back friends visiting from Gecko Galz. We are glad you stopped in. Here is the incredibly sweet image that Gecko Galz has provided as your freebie for the month.


 |
| My Grandma's Teacups February Feature Project for Gecko Galz. |
